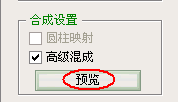
Choosing "normal" or "perspective" has a great influence on the resulting panorama. What we see in the "photo editing area" is exactly the same as the final panorama image, so the settings here must be careful. Before you decide to generate a panorama effect, you can see the effect of the panorama you created by using the Preview function in the Advanced Options in Composition Settings. (Figure 9)

Figure 9
The common options for several tool options in the "Tools Area" are clear at a glance and we don't have much to say. Instead, we should specifically explain the "rotary tool" and "set vanishing point tool" (Figure 10).

Figure 10
Use the Rotate tool to rotate the specified image in the editing area, and the Set Vanishing Point tool must be in the Perspective state. Because a picture after a "perspective" is distorted in order to accommodate the previous picture (as described previously), using the "set vanishing point tool" can change the order of the "primary and minor" of the two pictures to distorted pictures. The main picture is distorted by another picture, as shown in Figure 11 to see the effect before and after use.

Figure 11
In the normal case of making panoramas, we arrange them according to the order in which they are taken, and then generate panoramas. Prior to "determining" the composition, according to the effects required by Photoshop to edit the picture, it can be set whether the panorama is combined with a single layer, or whether these images are separately discharged in one layer and arranged only as a panorama. If you want to compose a layer, select “Sucking Layers†and place them on a separate layer. Then select “Hold Layer†(Figure 12).

Figure 12
Finally select "OK" to generate a panoramic picture in Photoshop (Figure 13). Using Photoshop CS's "Image Composition" feature will simplify the cumbersome process of creating a panoramic image. You can try to make your own panorama. !

figure 1